
Bitwig Spectral Suite Review
Bitwig has released a new set of spectral devices for use in their DAW. While the announcement of these devices was completely fumbled, something I go over in my previous article [link], I will not be discussing the pricing and circumstances surrounding the launch here in this article. I want to focus on just what these plugins can do, and how useful/ unique they may be.
First of all, you’ll notice each one of these is named something “Split”, this means each one of these is designed to take your signal divided it up into multiple outputs where you can apply effects to different bins according to each one’s main purpose. On their own, without adjusting the volume of each output, they don’t do anything, however, even just muting or soloing a single output can result in some interesting sounds.
Looking at each effect there are different colored channels relating directly to the frequency content on the display, this will give you an idea of how each effect is splitting the signal
Spectral effects typically have a “sound” to them, sorta watery, crystalline, glassy even, usually fairly washed out with plenty of digital artifacts, and I have to say these are incredibly clean and sometimes even avoid sounding typically “spectral”, though you can also push them in that direction as well.
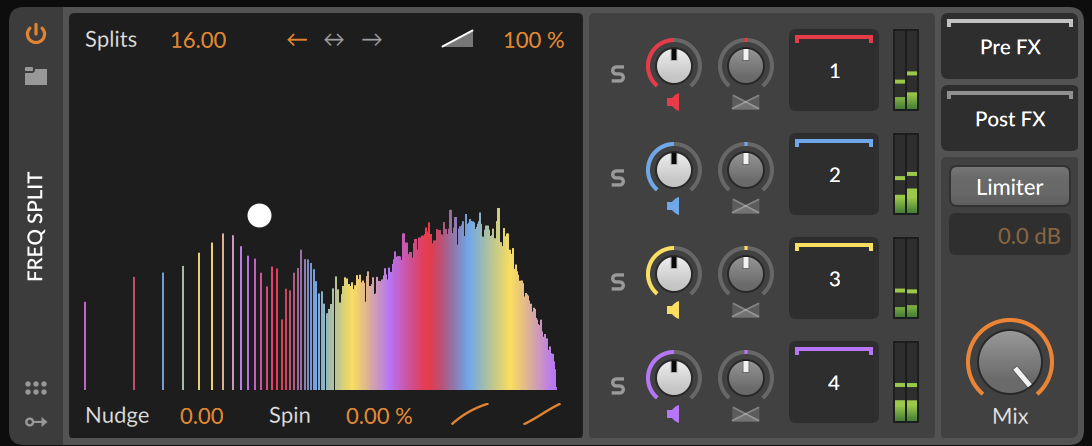
FREQUENCY: I think it’s best to start with the most straightforward and easy to understand device, “Frequency Split”. Also one of the most immediately fun and creative of the bunch, frequency split is definitely an effect. If you understand “Multiband FX-3” you can extrapolate the concept to this, in MBFX3, the signal is divided into 3 neighboring regions, low middle and high, with color coded outputs corresponding to each region. The same can be said about Frequency Split, but there’s a few notable distinctions: for one F-Split has a total of 4 regions, but also take a look at how those regions are divided in the spectrum. They are not 4 individual regions, but multiple bands alternating between each channel.
We can drop the number of splits down to 4 to recreate 4 regions, but this isn’t where the fun is at. Even with lower region numbers, you can “nudge” “spin” “bend” and “pinch” the bands in all sorts of interesting ways. Rather than applying effects to only one region of the spectrum, and maybe adjusting the bounds of those regions, we can rotate different effects through the spectrum, including up to 1024 splits, where effects are almost combed into their own ranges. Finally there is crossfade control, which determines how sharp each region fades into its neighbor
On its own: F-Split can be used as a spectral notched phaser, just drop the volume of any channels, and play around with the spacing settings to get all sorts of various notches and cut bands.

TRANSIENT: Transient split has the coolest UI of the bunch, with a cool spectral view, showing both regions of the split. The purpose of this device is rather obvious, it is to split the transient region from the body of the rest of the audio. I probably understand the mechanics behind how this one works the least, but it is the next easiest one to explain with only two outputs.
What’s important to realize is that this transient splitting works on the spectral domain, so if there are only high frequency transients, they won’t pass through low frequency content, this really isolates the transients of a signal further from the rest of the audio compared to a normal transient shaper effect.
Being able to apply effects to only the transient or body regions can be particularly useful for adding distortion or eq to a sound without it crunching through on the attacks.
The Tilt control focusses the transient detection either towards the highs or lows, this can be very useful to dial in exactly what part of the audio you want being split. The rest of the controls alter the focus and clarity of the transient detection, giving a lot of ways to sculpt exactly what domain of the transience you want to isolate. Even as I’m describing this, it doesn’t quite make sense or sound correct, perhaps in the future I will understand a better way to describe this.
On its own: Muting the body or “tones” channel and playing with the smoothing and decay controls can really create some watery harmonics, lots of interesting sounds to explore here.
Alternatively, you can mute the transients channel and with a high “analysis bias” you can really smooth out a signal, almost smearing it, or softening it.

LOUD: Probably my favorite out of the bunch, Loud split, divides the audio into 3 distinct volume regions. This may seem rather simple until you consider this is per frequency, meaning you can different areas of the spectrum get split up depending how loud they are. If you were to split audio just solely on volume level, ALL frequencies would go through whichever volume region the audio was currently at. This one surprised me just how useful and fun it could be and how clean it sounded, and was something I actually wanted recently. your loud mid and quiet ranges can each be set with their own crossover ranges, and rise/fall envelope for smooth transitions between ranges. The “Tilt” control adjusts the high and and low frequency tilt of the detection algorithm, allowing you to tilt the highs to be detected at a lower volume than the lows, or vice versa. This can be incredibly important for focusing on particular frequency regions.
Being able to apply effects to different amplitude regions per bin is incredibly useful, you can create noise suppression, spectral compression/expansion, distinct reverbs per amplitude, or even effects that only apply to the medium volumes. A perfect example for this would be distortion, being able to apply distortion to just the middle volume range means the loudest parts wont clip more than you want things too, and the quiet parts wont get boosted, you get the flavor of distortion without the consequences. Or even applying different reverbs to various signal amplitudes.
On its own: You can use L-Split as an incredible noise reducer by muting the quiet channel and adjusting its range to only include unwanted background noise.

HARMONIC: The last and probably most unique and obscure of the bundle is Harmonic Split. H-Split detects the frequency of incoming audio, and calculates the resulting harmonics based on that frequency combined with volume detection. From here you can split the audio into a “nons” non-harmonic channel, which would include both inharmonics and noise, and 2 alternating harmonic splits. The “harmonics pattern” control determines how often each harmonic alternates between outputs, or can be set to isolate just the fundamental from the rest of the harmonics.
Sensitivity controls how loud a potential harmonic must be and the potential frequency range that harmonic should exist in before being output to its respective channel. You can set a detection range so H-Split can better predict which notes the incoming audio might be producing.
It is worth mentioning this effect works best on monophonic sounds such as vocals, solo violin, horns, or leads/bass. Polyphonic sounds and drums really throw the detector for a loop and ultimately don’t make sense in the given context anyways. Perhaps one day in the future a polyphonic harmonic detector can be developed.
This effect is really one of the most wild of the bunch, and if it’s picking up the appropriate notes for the incoming audio properly, has amazing potential to transform your sound.
Being able to target effects on specifically just the noise, or certain harmonic portions of an instrument can really shift the voice and character of the resulting output
On its own: You can use H-Split to remove even harmonics from a leads or basses to “squarify” them. This results in a bit of a more natural squarification than using a comb filter as there is no ringing from a combs feedback. Assuming the detection is clean ofcourse.
While these effects can all do some neat things on their own, the power and creativity really comes in adding effects to each region. Also it’s worth mentioning how much the bitwig modulation system and device rack really plays into how intuitive and interactive these devices can be. Muting/soloing any channel with give you an idea of exactly what they are doing, but some effects worth playing with to really get an idea of how much transformative potential there is are delays and pitch shifters. Setting different delay lengths and pitch directions to each output really results in some very obvious transformations. Compressors, reverbs, and distortions are all useful for getting new character otherwise unachievable as well, but are much more subtle. It’s probably best to avoid eqs and filters with the F-Split and H-Split devices, as their results really wont alter the resulting sound a whole lot more than if they were just applied as normal. Obviously this isn’t true 100% of the time, but I point it out as an example that might highlight what these effects do.